Food platters are an ideal addition to any party for a family reunion or an informal dinner on a Tuesday night in case you’re unable to cook, but you still need to be a bit classy. Choosing the best items to place on your platter of food and the best way to create a worthy post for it being featured on an Instagram post can be challenging. However, the process of creating a delectable and gorgeous platter is easy.
Begin with the board.
The first step for any dish, whether it’s an ice cream platter, a fruit platter, or any other type, is to get a sturdy base. There is nothing extravagant, and a giant chopping board will do – but you must make sure that the dish is big enough to accommodate all the food you want to serve but not too big that it will leave empty spaces.
Food groups to create an ideal plate
An adequate food buffet is about offering a variety of options. Make sure to include at least four of these groups on your table. However, we’ve found that only one or two items in each category are practical. Here’s a handy checklist and included some ideas for the ideal food items to include from the following groups:
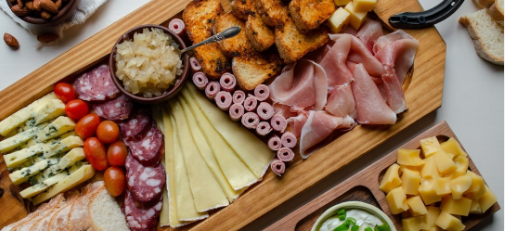
- Dairy: Include at minimum three kinds of cheese on the platter. Use various varieties to keep things fascinating.
- Fruity – think of the fruits of summer: peaches, strawberries, watermelon, and cherries. Add any seasonally-available fruits and vegetables that can add color and freshness to the food you serve.
- Meat – visit the store and buy a few types of meat. Pay attention to your customers this time, and don’t purchase only hot meats when you have an individual sensitive to the heat.
- Antipasto and dips – We enjoy mixing in a chunky dip, hummus, or olives.
- The bakery includes a variety of gorgeous artisan-made crackers, fresh sourdough bread as well as water crackers
- Nuts dried or dried – any type of nut will work, but we prefer pistachios or the pistachios
- Sweet: break apart your favorite chocolate chunk and spread it on the table. If you want to keep it child-friendly for your guests, try chocolate-covered pretzels or chocolate-covered sultanas.
Preparation is the key to success.
Most of the time, when making food-related platters, you typically do it for a special occasion like an evening party, gathering, or picnic. What you don’t want to do on that day of the celebration is to cut cheese or cut up meats. One great idea is to make all the food items, cheeses, and other antipasto pieces the night before.
Roll all the meats you want and cut any hard cheeses. You can store them in an airtight container similar to one of our Daily Cube containers. Also, you can add all the antipasto dishes to their bowls, cover them with cling or beeswax wraps, and put them in the refrigerator until it is time to serve them on a platter.
Also visit now: bombaybbqcompany
Assembling the food tray
Okay, let’s move on to what you need to know about how to make your plate.
Start with those items that occupy the most significant space on the food platter. The rest can be added later. It is a good idea, to begin with small bowls of antipasto additions. You could skip the bowls; however, they add an extra height and dimension to the food platter. Also, it is excellent for people with food allergies or who are apprehensive that olive juice gets on the cheese (there is nothing more unpleasant!)
Shift towards the cheese when you’ve set your antipasto bowls in various places on the platter. The soft cheeses are best kept intact and scattered with the hard cheeses you cut out on the plate in smaller portions. The ideal scenario is that cheeses are served chilled; therefore, if you plan to do the platter immediately, take your cheese from the refrigerator for at least 30 minutes before beginning.
After you’re happy with the arrangement of your cheese, you can begin to make the spaces with the meat. Grab your pre-rolled beef, and put it on the plate. There’s nothing artistic about this. However, the more random, the more enjoyable. If you follow any vegan or vegetarian diet, You can put all the meat on one portion of your platter or just leave it all off while filling your table by adding more fruits and appetizers.
Then comes bread and crackers. Since we want the plate to concentrate on the cheese, avoid overloading your table by putting on crackers. Make a couple of handfuls of the desired carbs and set them on the edge of your platter so that they’re accessible to reach for. The rest of the food can be placed into a bowl adjacent to the plate so that you can quickly replenish it.
The time has come for the rest! It’s the time to play and have fun while adding your own WOW factor. Make sure to fill any gaps on the table with color elements, including fresh fruits and vegetables and dried ones. In addition to adding a hue, this can help to add harmony.
After that, sprinkle the nuts and sweets within any last small space. We’re almost done!
The final thing to do is ensure you have a garnish for the most Instagrammable platter. It is possible to use any garnish in this. However, we usually choose something a bit in the color green to ensure that it looks fresh. You can try a handful of green leaves from Rocket, or a few herbs, whatever is on the shelf!
You may also like
-
The Timeless Joy of Backyard Cookouts
-
Indian Food Takeout: Challenge of Retaining Texture in Takeout Curries
-
Getting Halal Certification in USA for Your Food Business
-
Why You Should Reserve a Table at Your Favorite Indian Restaurant
-
Why Late-Night Fast Food Runs Are a Southern Tradition – And Where to Find the Best Picks